


Using BASH and other Linux tools on Windows 10 for processing Whois data
This is technical blog for our subscribers of daily or quarterly data feeds to facilitate the use of our client-side BASH scripts and perform other operations on their data.
This blog is for you if you are a Windows user and want to use BASH for processing Whois data. We describe how you can set up an environment in Windows which does not only facilitate the use of BASH scripts of WhoisXML API, but gives a general access of many tools and features available mainly in Linux and UNIX type systems. So if you are interested in a Linux-type approach of handling these data or developing, but you do not want to set up a separate (virtual) computer with a Linux and you want to see your files within your Windows system directly, please proceed reading.
If you are a Linux/UNIX user anyway, this document may also be interesting for you in order to see how you can work in the same way on a Windows system. (Of course you can skip some introductory Sections in this case.)
Introduction
WhoisXML API provides bulk data for downloading and setting up Whois databases. There are several end-user utility scripts provided to support this kind of use. Some of these are portable and can be used on any platform flawlessly. Some of the provided scripts are, however, written in Bourne Again Shell, one of the most prevalent shells in the Linux/UNIX community. While for users of Linux and Mac OS X it is straightforward to use these scripts, too, using shell-scripts is not prevalent and a bit less straightforward to use them.
Our approach is based on the recently introduced “Ubuntu on Linux” service available on Windows 10 since the Anniversary Update. Thus you have to work on this platform if you wish to follow our approach presented here. For other Windows systems there are similar approaches, too (including Microsoft Services for Unix, Cygwin or MinGW), but we do not address them in the present document.
Installing Ubuntu on Windows
First you need to install the required component onto your Windows system. First of all, you need to do a few simple steps as described on MSDN, here in particular:
https://msdn.microsoft.com/en-us/commandline/wsl/install-win10
The installation should work flawlessly: you enable the feature from PowerShell, then install Ubuntu from the Warehouse, and you are done. However, we had the experience that even after the installation of the warehouse, when trying to start BASH, it still complained about not having installed any Linux distribution. So we had to start a command-prompt as system administrator, and run the command
lxrun /install
albeit according to the documentation this is not needed anymore. Maybe you will not run into this issue, but if yes, this information can help.
After all, there will be an application named BASH, and you can start it from a start menu. A console will appear, and you will be prompted to create an account. Please prefer small alphanumeric characters in your username, and do not use spaces. Having entered a username twice, you have a the prompt of the popular Bourne Again Shell, or BASH. So welcome to the world of Unix command-line.
What next: exploring the shell
The way how to do use BASH interactive, shell scripting and use other utilities is almost the same as if you were sitting next to a Linux box using a virtual terminal. Here, if you start Ubuntu from the start menu, you will encounter the following window.

The command prompt has the format
username@HOSTNAME:workingdirecotry$
In the picture, the working directory is “~”, which stands for the actual user’s home directory. In Linux and UNIX systems the elements of file path are separated with “/” instead of the DOS/Windows convention “\”. It is important to know that from the command prompt you can find your drives under the directory /mnt, e.g. dirve c: is under /mnt/c. This is the way how you see your Windows files. If you want to see the files of your Linux inside windows, it is under
C:\Users\WINDOWSUSERNAME\AppData\Local\lxss
Your Ubuntu home directory (“~”) is under
C:\Users\WINDWOSUSERNAME\AppData\Local\Lxss\home\LINUXUSERNAME
whereas the root of the Ubuntu directory (“/”) is under
C:\Users\WINDOWSUSERNAME\AppData\Local\Lxss\rootfs
If you are familiar with BASH from Linux or some other UNIX-type system, you can start working right away. If you are new to it, you may follow any tutorial valid for Linux systems. Here we focus on particular cases related to Whois data.
Keeping your Ubuntu subsystem up-to-date
There are a few steps you need to do before we proceed. Everything in what follows is done in the BASH command-line.
First of all, turn into an Ubuntu system administrator with the command
sudo su
which will prompt for your password. Then do
apt-get update
which will collect the available updates for your Ubuntu software. To install them, just say
apt-get upgrade
and say “y” for everything. Do these steps regularly to keep your system up-to-date.
Installing extra utilities
In the windows BASH command-line you can install any application from Ubuntu’s huge repository of software. Before doing so, we recommend to run
sudo apt-get update
first, in order to refresh the list of currently available software. (Note: if you running sudo the first time within the session, you will be prompted for your password.) If you don’t know the name of the software package to install, you can search the repository for any term:
apt-cache search <search term>
In order to install a package, you need to
sudo apt-get install package_name
For instance, we shall need a utility “pv” in what follows. You can see how it is done in the following screen shot:
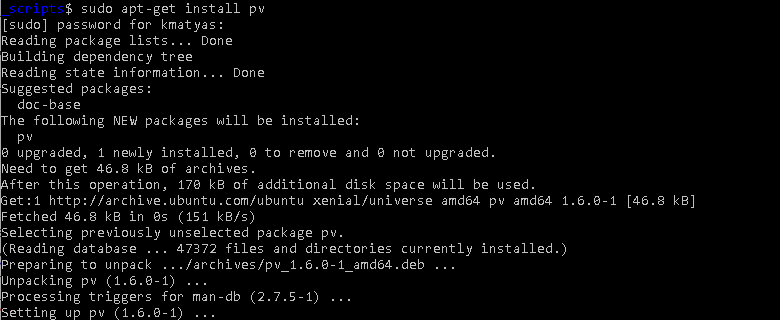
As you can see, the package manager does the favor to download, install and set up programs for you, just like the “warehouse” in Windows. In addition, we’ll need the package “mysql-client”, so please also do
sudo apt-get install mysql-client
Having done this, let us discuss now how to use MySQL in this context.
Using the native windows mysql from bash
If you decide to set up a Whois database in MySQL, one option might be to install mysql server under your Linux subsystem in your Windows. However, it is likely that you prefer to use the native MySQL server installed from the Windows package available from MySQL’s download pages.
There is an issue, however, when using the native MySQL: when starting a native Windows program from the BASH shell, GUI-based programs work well, but there are issues when using a Windows exe in shell pipeline or interactively in a console. Here we describe how to overcome this issue in case of MySQL. (This can be of use for other programs, too.
The trick is: at the end of the last paragraph we have installed a MySQL client in BASH. So we can start it, but actually it will not see our native server, running in the Windows box: it is looking for a server running within the Linux framework. However, if we create a file named my.cnf in our BASH home directory “~”, with the following contents:
[client]
user=root
password=MYSQLROOTPASSWORD
host=localhost
protocol=TCP
our mysql client will connect to the server running on the Windows part. Here is how to create a file:
- Start BASH, or if it is running, change to your home directory with the cd command (without any arguments).
- Type “nano .my.cnf” (notice the dot “.” before “my”), and copy-paste the desired contents from above. Replace “MYSQLROOTPASSWORD” by your mysql root password. When finished, press CTRL+x to exit from nano, and answer “yes” to actually write the file. Note: the lines “username” and “password” set the default username and password to use when it is not specified. You can omit these lines and provide these data every time you invoke the mysql client).
- Set the permissions of the new file (it will be ignored otherwise): chmod 600 .my.cnf
Now you can type mysql in bash and there you have the proper prompt.
So we are ready to see some examples of use of WhoisXML API client-side scripts.
An example of using WhoisXML API BASH scripts
WhoisXML API provides scripts to end-users in support of downloading bulk WHOIS data from data feeds as well as for setting up and maintaining a WHOIS database. These scripts are available from a public repository on github:
https://github.com/whois-api-llc/whois_database_download_support/
This is a complete package of scripts for various tasks, written in bash or Python. You may download them in a zip file from there and extract it somewhere. But now that you have a decent bash command-line, you may also use git for the purpose. Just open the bash shell (the Ubuntu command-line window). First check if git is installed (you need to do it just once):
sudo apt-get install git
Then go to the directory where you want to have the script package. Assume for now that it is your home directory (referred to as “~” in bash). The command to download the scripts is
git clone https://github.com/whois-api-llc/whois_database_download_support.git
This will create a subdirectry “whois_database_download_support” with all the scripts We shall use one of them, written in bash to demonstrate the use of bash scripts on Windows.
Let us assume that we have a directory named “whois_data” on drive “D:” where we want to download some data. In the example the data will be mysql dumps from the quarterly database release v6 for the .hu and .eu domains.
First do
cd whois_database_download_support/whoisxmlapi_whoisdownload_bash
in order to change into the script’s directory. Here you have to make the downloaded script executable by the command
chmod +x whoisdownload.sh
To download your data you have to type the following (without line breaks, replacing USERNAME and PASSWORD with your WhoisXML API web login credentials):
./whoisdownload.sh ‐‐verbose ‐‐user USERNAME ‐‐password PASSWORD
‐‐data-feeds domain_list_quarterly ‐‐file-format sql ‐‐db-version v6
‐‐tld "hu eu" ‐‐output-dir /mnt/d/whois_data
The script will soon report that the files are downloaded. You may check the directory d:\whois_data, your data will be there indeed.
So let us load them into the database. For this we get the script at
downloading it into a directory where we are in BASH. Having saved it, we have to make it executable:
chmod u+x load_mysql_data_all.sh
Then we can load data (takes some time) by typing (without line breaks):
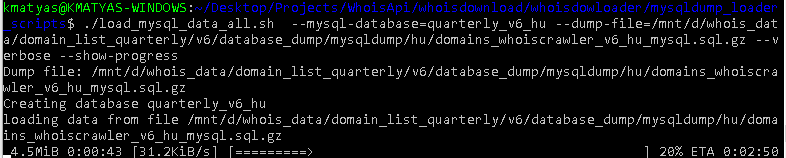
./load_mysql_data_all.sh ‐‐mysql-database=quarterly_v6_hu
-dump-file=/mnt/d/whois_data/domain_list_quarterly/v6/database_dump/mysqldump/hu/domains_whoiscrawler_v6_hu_mysql.sql.gz
‐‐verbose ‐‐show-progress
As shown in the screen shot below, we can follow the load procedure with a smart progress bar:
Finally we can verify, also from any native Windows MySQL GUI tool (e.g. Workbench) that the data are there indeed.
Conclusion
The new Ubuntu on Windows subsystem brings the power of Linux/UNIX command-line to Windows. This makes it possible to use the client-side scripts provided by WhoisXML API and perform other data processing operations with BASH scripting. Moreover, you can do anything you would do on a Linux/UNIX machine using this approach.