


Setting up a whois database from WHOIS XML API data
This is technical blog describing how you can download bulk data from a data feed subscription at WhoisXML API, and how you can use them to set up a local Whois database on your server.
Our starting point is that you need data for some domains in files or in a database, for a given period of time. We describe how to achieve this goal in two Sections: the first one describes how you can access and download the data you need. The second one describes how to set up a database from the downloaded data, ranging from relational databases such as MySQL to other, noSQL storage methods, such as MongoDB.
Downloading bulk Whois data
In this section we describe how to get bulk Whois data. Each subsection is to be considered as a step of this procedure.
Decide the type of data you need
Bulk Whois data are available in the framework of data download subscription plans from WhoisXML API in various formats and with a variety of contents. In order to understand the logic of this structure is important to understand data feeds. A data feed is physically a directory which you can access within your subscription either on the web or on our ftp servers. Logically, a data feed holds data collected in a given structure at given times. There are two types of data feeds: quarterly and daily. In what follows we describe briefly the main idea behind these. Later in this document we shall present actual examples of the use of both.
Quarterly data are organized into release versions (or “database versions”) specified by a version number, e.g. for generic TLDs, the version v21was released on September 1, 2017, and contains cumulated data for the three months before its release date. There are two types of releases: those for generic TLDs (gTLDs) and those for country code TLDs (ccTLDs). The version number of the ccTLD and gTLD release for a given period is different, e.g. for the period in the above example, the respective ccTLD version is v7. However, the periods for which the data are collected have the same beginning and end dates for gTLDs and ccTLDs, and both the version numbers are incremented for the next period.
These data can be used for the analysis of longer periods. Also, in order to bootstrap a database to contain daily actualized data but include also information for a longer period back in time a suitable approach is to obtain quarterly data as a basis and set up daily updates using daily feeds.
For quarterly data we use the concept of feeds mainly in order to specify of the format and organization the downloaded data.
Altogether to download quarterly data you will need the release version, the TLDs you are interested in, and the feed name which suits you the most.
Daily feeds typically reflect the daily status or certain changes of domain registrations, while quarterly data cover three months. In case of daily feeds, e.g. the one named domain_names_new provides the list of domains newly registered domains for a major gTLDs day by day, whereas domain_names_whois provides detailed Whois data of these domains. Within a feed’s directory you find data for days and domains in subdirectories. Thus in contrast to quarterly data, there are much more daily feeds and they differ significantly in the logic of the preparation and filtering of data as well as in the sources of the data in some cases.
When downloading from daily feeds, you will need the feed name, the dates, and the top-level domains (TLDs in what follows) you are interested in.
In any case it is good idea to take look at the documentation first. There is a manual for daily feeds of generic TLDs, one for country-code TLDs, and each quarterly release (there are separate gTLD and ccTLD releases) has its own manual. It might be the case that if you read the relevant part of the respective blog, you will just skip the rest of the present manual, however, it is worth to proceed to obtain a generic overview and practical recipes.
So far we assume that you chose the data you need, and you have found the respective feeds.
Review your infrastructure
You should bear in mind that bulk Whois data sets can be huge. The data of a few smaller TLDs can be handled with a usual desktop or laptop. But, for instance, the quarterly data for a large gTLD such as “com” it is likely that you will need more resources. As an example: the MySQL dumps of the “com” domain in the quarterly release v20 are contained in gzip compressed file of 115 gigabytes. So please be prepared:
- it will take time to download data,
- you will need significant memory and CPU resources to handle the data,
- operations of processing, such as, e.g. loading data to a local MySQL database will take time.
And by time we really mean much time: hours or even days in some cases. Also, you have to make sure that the computer(s) you are using are suitable for the task. It might be the case that you are handling “big data”.
Choose the appropriate formats for your software tools
Having considered the software and hardware requirements and the information needed to specify certain data sets to be downloaded, now we turn our attention to the available data formats and the software they can be processed with. There will be more details about these pieces of software and the approaches they represent. However, when deciding which data to download, you have to make some preliminary considerations
As of formats, one choice is: csv files. That is, “comma separated values”, even though the field separator character is often not the comma. These are simple unicode text files in which each record is a line, and the fields of records are separated by separator characters. The benefit of this format is that it is very portable and it can be imported by the spreadsheet components of popular office suites. But again: bear in mind the size of the data you are handling. If you need data of “small” TLDS for shorter periods, you can just use your favorite spreadsheet application and import the csv file, but in case of certain records, the spreadsheet is just not the appropriate approach.
Even for larger domains csv files can be quite efficiently processed with tools such as awk, sed or perl. Another choice might be to directly handle the data with custom programs written in a preferred programming language. Python, for instance, does have libraries handle csv files. With these you may cope with many tasks, including finding data of certain domains, statistical analysis of domain registrations, etc.
And still about the use of csv format: if you decide to go for a relational database but you prefer a database management system other than MySQL which we support directly, such as PostgreSQL, Orcale, MongoDB, or powerful and flexible search engines such as solr or Elasticsearch, csv can be imported into any of these.
As we at WhoisXML API use MySQL for storing data and exporting it to other formats, we provide additional support for this one at the level of downloadable files. Namely, you can download dump files that MySQL can read directly. There are two kind of dumps. MySQL’s standard is to dump databases in an ASCII format (these are simply combined DDL/DML files to reproduce the database). Binary dumps are not supported by MySQL, but there are third party products to create them. From these you can create your database much faster than from ASCII dumps. We use Percona's products to generate binary dumps. These have the benefit that you don't even need Percona's product yourself to load them: you can do it along the instructions given in the READMEs of our binary dump loader scripts.
Download data
At this point we assume that there is a set of data you have chosen to download. There are several options to actually download the data you may choose the one you prefer the most. The solutions range from the simple download of a few data sets at once to the programmed regular downloading of certain sets.
The very basic way: web download. You just open the feed directory in your browser and download the files by clicking to them. This is easy but very time consuming: the data you need are frequently in subdirectories and you have to click them one-by-one. So unless you need just a few files, I'd not recommend this method.
A better way is ftp. Whois XML API has started to introduce this option as of December 2017, so at the moment of writing this blog it is not fully applicable to all feds, but it is an easy and efficient way. You need to choose a suitable ftp client. For interactive use, there are cross-platform GUI based solutions available, such as, e.g. FileZilla. For programmed downloading from within a script, a variety of command-line clients can be chosen: beside the basic ftp clients, the more sophisticated downloaders such as wget or lftp can be a good choice, just as in case of http access
In the description of the feed you can find the ftp server where the feed directory resides and also the name of the feed directory. This latter is typically the name of the feed but there are some exceptions. You will find the feed directory below your ftp home directory on the given server. In fact you will see all the feeds of the given server you have an access to. So you open a session in your ftp client and download what you need. A few words of warning are in order though.
- Ftp always gives you full directory listing, which is a slow operation (recall that you are downloading from a location which holds several terabytes of data). So please be patient.
- Also, if you choose to download a full directory (“just in case”, “why not”), its contents maybe huge, and thus the download lengthy. So choose rather carefully what to download.
Now back to web access: With the aforementioned command line utilities (lftp or wget) you can write scripts to download data through the web access as well. We provide such download scripts for our customers. Our aim with this is twofold: you can use our scripts as an example to develop your own custom downloaders. Or you can use them as they are for downloading, interactively, in command-line or invoked from within your own script. You may choose from Bash and Python scripts.
To familiarize yourself with the practice of downloading, the use of the script “download_whois_data.py” is recommended. This one is written in series 2 Python. It comes in a zip file where you can find the installation instructions. You can use it on all the main platforms: Linux, Windows, Mac OS X, other BSD variants, etc.
All our scripts, including this one, support a number of command-line options. In this case you can use the downloader script to download in an automated manner. This can be suitable for automated downloading as well. We do not go to details of the command-line options here, all scripts have a README and all of them support the ‐‐help option.
But the very script we just discuss, download_whois_data.py, can be used in a simpler way, too. Just invoke it without arguments (or double-click in windows). The following dialog will appear:
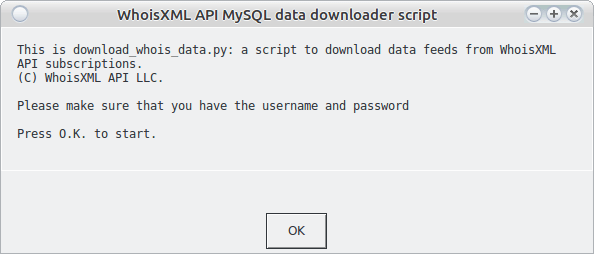
So this program can be used in an entirely interactive fashion, the details of the download will be specified with the aid of a series of such dialog windows. It is worth doing it this way first: when called from command-line, the same information has to be provided using command-line options.
Pressing O.K. you can start the configuration of your download.
To illustrate the download procedure, we go through two use cases in detail. We will use these data in the next step to set up a MySQL database. The description of the first use case contains a detailed description with information of general importance. It is about downloading from a quarterly feed. The second use case addresses daily download of data, We describe there the differences compared to the first use case.
USE CASE 1: Download quarterly data for ccTLDs “.eu” and “.hu” from the quarterly release v6.
The GUI approach.
Having started the downloader program without arguments or by double clicking, after pressing O.K. in the welcome dialog, the following dialog window will appear.
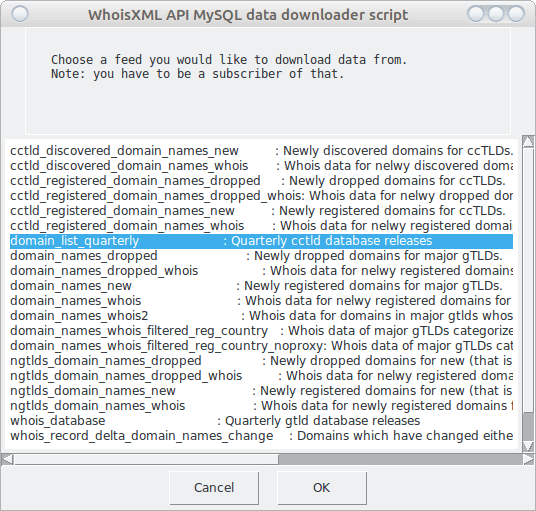
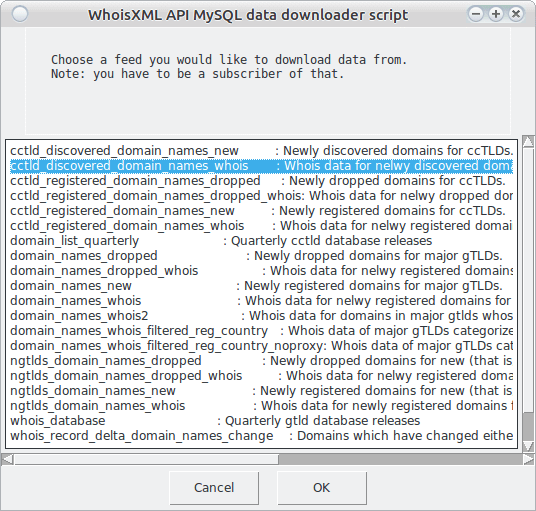
The first item is chosen by default, but we choose “domain_list_quarterly” instead, these are the quarterly data for ccTLD-s. Note that there are only two quarterly feeds, this one, and “whois_database”, which is for gTLDs, all the others are daily. We shall return to those later.
Also note, that in the terminal window in which you have started the script, additional information appears throughout the download process. (On Windows, if you start the script by double click, a console window will appear for this purpose in parallel. Please do not close it.)
By pressing “OK” we can proceed. The whole download procedure can be stopped anytime by pressing “Cancel”. Next we have to choose the preferred data format:
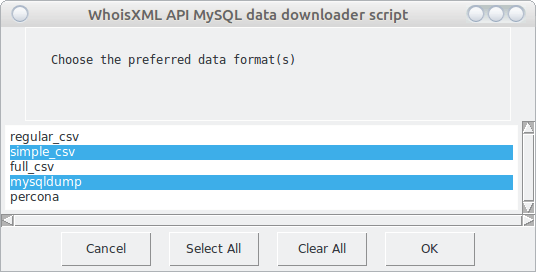
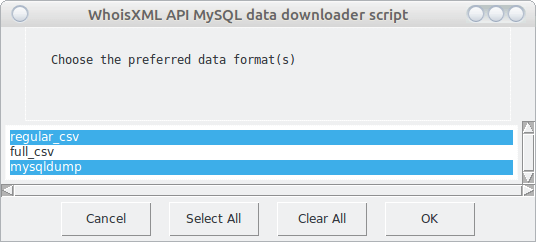
The available formats vary depending on the feed. This is a multi-choice box: you can choose multiple formats. Note that the first one is always chosen by default, so you have to click onto it if you don’t need regular csv in this case. Now We chose mysqldump as We intend to set up my MySQL database, and also simple_csv as We want to demonstrate this one, too. The formats are documented in the manual for the data. As the chosen domains are small ones, we choose “mysqldump” which provides the standard mysql dump files. These are portable and robust. However, for bigger domains, binary dumps are probably a better choice. You need to choose “percona” to get them.
Having chosen the required format, we proceed by pressing OK. We’ll be asked for the release number of the quarterly feed, termed also as “database version” in our terminology. We chose v6:
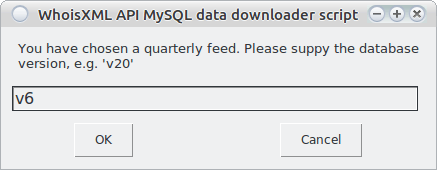
This you have to be aware of, and you may download from one quarterly version at a time. If you choose a non-existent version, the script will later quit in the same way as if you had not provided appropriate login credentials.
By pressing “OK”, we arrive at the input of login credentials, provided with your account:
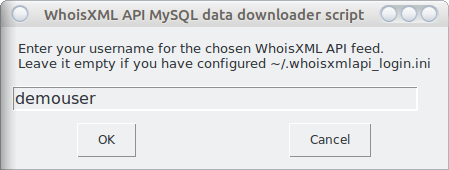
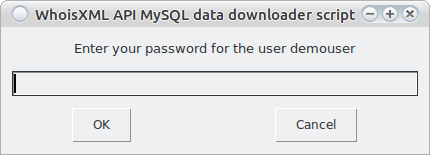
Note that you may set up an ini file with your credentials, as described in the README of download_whois_data.py. We recommend this as then you don’t need to enter this data every time you run the script. If you had set it up this way, leave the above input box empty and press “OK”. If, however, you have entered a username, you will be asked for the respective password:
Having pressed OK, the program will first verify if you have an access to the requested data with your credentials. Were this not the case (wrong credentials, or non-existent database version), it will quit with an error.
Having passed this check, you will have to wait a bit, the list of supported TLDs for the chosen setup will be downloaded. So after some time you will encounter the following multi-choice box:
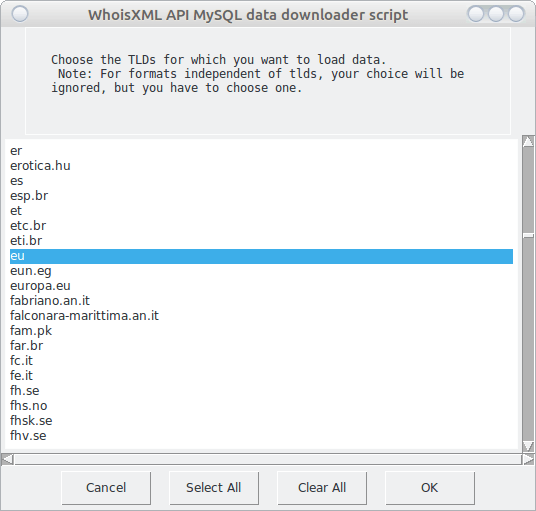
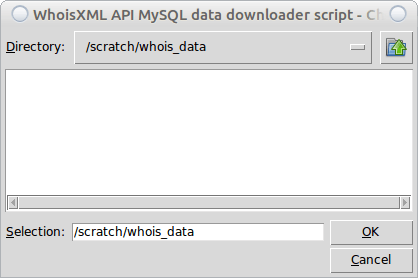
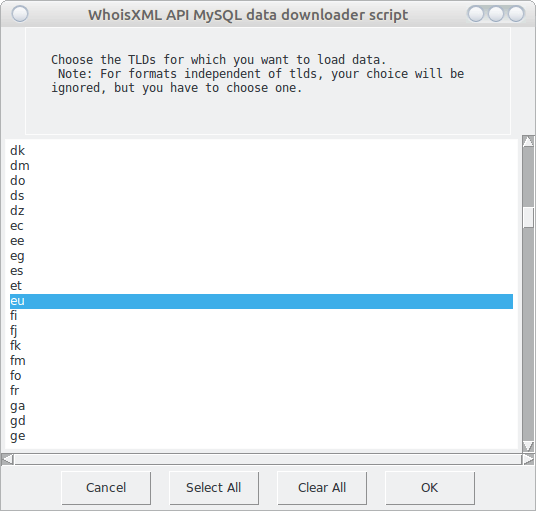
Choose the TLDs you need the data for (you may choose all by the “Select All” button, and press “OK”. We now choose the “eu” and “hu” domains as we need these for at the moment. Then finally you have to decide where to download the data, so a directory selector will open:
Having pressed “OK”, all the dialog windows will disappear, possibly for a longer time. But you can follow the progress in the terminal window or in the console which opened on a Windows system. As the download can take some time, let us consider what is going on, as it is not a trivial download procedure:
- In most of the cases we have md5 checksums of the files. If the script finds the file under the given location, it evaluates the checksum and does not redownload it if it is already there. If the file is broken, however, there will be several attempts (you can configure this) to redownload them.
- Broken or missing files will be redownloaded and verified.
When the script finishes its main activity, you will see the following window (warning: please do not press OK immediately.)

As the text in the box says, it is worth taking a look at the terminal or console (the Windows console, if the script was started by a double click, will close if you press “OK”). If everything is OK, you will find the following lines at the end of the output:
Download finished.
Everything has been downloaded successfully.
If not, you will be given a list of files which (at least according to the script) should have been there but couldn’t be downloaded. Note that in some cases this is not a real error, maybe the files were not yet there, or there were no data for a given TLD (this is more typical in daily feeds though).
Taking a look at the target directory, it will have the following contents:
.
└── whois_data
    └── v6
        ├── csv
        │   └── tlds
        │       └── simple
        │           ├── csvs.eu.simple.tar.gz
        │           ├── csvs.eu.simple.tar.gz.md5
        │           ├── csvs.hu.simple.tar.gz
        │           └── csvs.hu.simple.tar.gz.md5
        └── database_dump
            └── mysqldump
                ├── eu
                │   ├── domains_whoiscrawler_v6_eu_mysql_schema.sql.gz
                │   ├── domains_whoiscrawler_v6_eu_mysql_schema.sql.gz.md5
                │   ├── domains_whoiscrawler_v6_eu_mysql.sql.gz
                │   ├── domains_whoiscrawler_v6_eu_mysql.sql.gz.md5
                │   └── tables
                │       ├── domains_whoiscrawler_v6_eu_contact_mysql.sql.gz
                │       ├── domains_whoiscrawler_v6_eu_contact_mysql.sql.gz.md5
                │       ├── domains_whoiscrawler_v6_eu_domain_names_whoisdatacollector_mysql.sql.gz
                │       ├── domains_whoiscrawler_v6_eu_domain_names_whoisdatacollector_mysql.sql.gz.md5
                │       ├── domains_whoiscrawler_v6_eu_registry_data_mysql.sql.gz
                │       ├── domains_whoiscrawler_v6_eu_registry_data_mysql.sql.gz.md5
                │       ├── domains_whoiscrawler_v6_eu_whois_record_mysql.sql.gz
                │       └── domains_whoiscrawler_v6_eu_whois_record_mysql.sql.gz.md5
                └── hu
                    ├── domains_whoiscrawler_v6_hu_mysql_schema.sql.gz
                    ├── domains_whoiscrawler_v6_hu_mysql_schema.sql.gz.md5
                    ├── domains_whoiscrawler_v6_hu_mysql.sql.gz
                    ├── domains_whoiscrawler_v6_hu_mysql.sql.gz.md5
                    └── tables
                        ├── domains_whoiscrawler_v6_hu_contact_mysql.sql.gz
                        ├── domains_whoiscrawler_v6_hu_contact_mysql.sql.gz.md5
                        ├── domains_whoiscrawler_v6_hu_domain_names_whoisdatacollector_mysql.sql.gz
                        ├── domains_whoiscrawler_v6_hu_domain_names_whoisdatacollector_mysql.sql.gz.md5
                        ├── domains_whoiscrawler_v6_hu_registry_data_mysql.sql.gz
                        ├── domains_whoiscrawler_v6_hu_registry_data_mysql.sql.gz.md5
                        ├── domains_whoiscrawler_v6_hu_whois_record_mysql.sql.gz
                        └── domains_whoiscrawler_v6_hu_whois_record_mysql.sql.gz.md5
This is the very structure we have on the web site and on our ftp servers. It is suitable, as it is, for our other scripts provided to process data. So the download has been performed.
The command-line approach.
In many cases the automated downloading of files is more preferred. You can perform the same task as in the above interactive workflow simply by invoking the script with the following parameters (you can write it into a single line without the “\” characters):
./download_whois_data.py ‐‐verbose ‐‐username demouser \
‐‐password demopassword ‐‐feed domain_list_quarterly \
‐‐db-version v6 ‐‐dataformat mysqldump,simple_csv \
‐‐tlds hu,eu ‐‐output-dir /scratch/whois_data
This you can integrate to your own automated processes. For a complete list of options of the program, you can invoke it with the ‐‐help option. It has a detailed description in the README file supplied with it.
The success or failure of the download will be reported in the terminal or console in the same way as in the interactive case.
We remark here that there is a similar command-line tool available in BASH, and a PHP version is under development at the time of writing this blog. You may use them as well according to your preferences. If you intend to write your own custom downloader, you may borrow ideas from our code.
USE CASE 2: Download newly registered domains for the “hu” and “eu” domains for the week starting on 12 November 2017.
The GUI approach.
Again, we invoke the download_whois_data.py program, without arguments or with the ‐‐interactive option, or by double clicking on Windows systems. In the feed selection dialog I choose “cctld_domain_names_discovered_whois”:
From the formats available for the following two feeds I choose the following two:
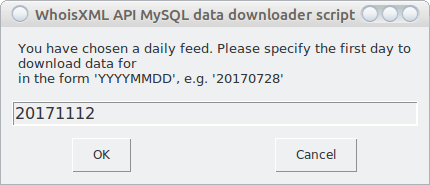
As this is a daily feed, I will be prompted for the beginning and end date of the interval I’m interested in:
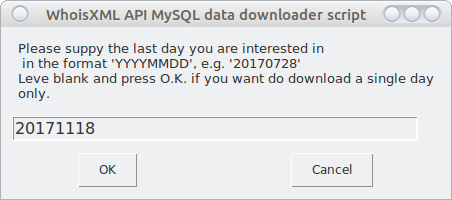
Had we left the second input blank, the download would be done for the single day specified as a starting date.
As in use case 1, the login credentials will be established. Then the windows disappear and we have to wait. The reason is: the list of supported TLDs are provided day by day for each feed. The program downloads this list for each day and determines their superset to offer the choices. This takes time, especially for longer intervals. You can follow the progress in the terminal or console. Finally, the selection window will appear. I choose “eu” and “hu” according to my intention:
The rest of the procedure is the same as in the first use case: after providing the target directory, the download will be performed, and the conclusion of the workflow can be found in the terminal or console.
Note that some feeds contain just changes, so even for a supported TLD there might be no changes. In that case a script will report that the respective files are missing, but it is normal.
In the present case, the following files and directories will appear in the output directory:
‐‐ whois_data
    `‐‐ cctld_discovered_domain_names_whois
        |‐‐ 2017_11_12_eu.csv.gz
        |‐‐ 2017_11_12_eu.csv.gz.md5
        |‐‐ 2017_11_12_hu.csv.gz
        |‐‐ 2017_11_12_hu.csv.gz.md5
        |‐‐ 2017_11_13_eu.csv.gz
        |‐‐ 2017_11_13_eu.csv.gz.md5
        |‐‐ 2017_11_13_hu.csv.gz
        |‐‐ 2017_11_13_hu.csv.gz.md5
        |‐‐ 2017_11_14_eu.csv.gz
        |‐‐ 2017_11_14_eu.csv.gz.md5
        |‐‐ 2017_11_14_hu.csv.gz
        |‐‐ 2017_11_14_hu.csv.gz.md5
        |‐‐ 2017_11_15_eu.csv.gz
        |‐‐ 2017_11_15_eu.csv.gz.md5
        |‐‐ 2017_11_15_hu.csv.gz
        |‐‐ 2017_11_15_hu.csv.gz.md5
        |‐‐ 2017_11_16_eu.csv.gz
        |‐‐ 2017_11_16_eu.csv.gz.md5
        |‐‐ 2017_11_16_hu.csv.gz
        |‐‐ 2017_11_16_hu.csv.gz.md5
        |‐‐ 2017_11_17_eu.csv.gz
        |‐‐ 2017_11_17_eu.csv.gz.md5
        |‐‐ 2017_11_17_hu.csv.gz
        |‐‐ 2017_11_17_hu.csv.gz.md5
        |‐‐ 2017_11_18_eu.csv.gz
        |‐‐ 2017_11_18_eu.csv.gz.md5
        |‐‐ 2017_11_18_hu.csv.gz
        |‐‐ 2017_11_18_hu.csv.gz.md5
        |‐‐ add_mysqldump_2017_11_12
        |   |‐‐ eu
        |   |   |‐‐ add_mysqldump_2017_11_12_eu.sql.gz
        |   |   `‐‐ add_mysqldump_2017_11_12_eu.sql.gz.md5
        |   `‐‐ hu
        |       |‐‐ add_mysqldump_2017_11_12_hu.sql.gz
        |       `‐‐ add_mysqldump_2017_11_12_hu.sql.gz.md5
        |‐‐ add_mysqldump_2017_11_13
        |   |‐‐ eu
        |   |   |‐‐ add_mysqldump_2017_11_13_eu.sql.gz
        |   |   `‐‐ add_mysqldump_2017_11_13_eu.sql.gz.md5
        |   `‐‐ hu
        |       |‐‐ add_mysqldump_2017_11_13_hu.sql.gz
        |       `‐‐ add_mysqldump_2017_11_13_hu.sql.gz.md5
        |‐‐ add_mysqldump_2017_11_14
        |   |‐‐ eu
        |   |   |‐‐ add_mysqldump_2017_11_14_eu.sql.gz
        |   |   `‐‐ add_mysqldump_2017_11_14_eu.sql.gz.md5
        |   `‐‐ hu
        |       |‐‐ add_mysqldump_2017_11_14_hu.sql.gz
        |       `‐‐ add_mysqldump_2017_11_14_hu.sql.gz.md5
        |‐‐ add_mysqldump_2017_11_15
        |   |‐‐ eu
        |   |   |‐‐ add_mysqldump_2017_11_15_eu.sql.gz
        |   |   `‐‐ add_mysqldump_2017_11_15_eu.sql.gz.md5
        |   `‐‐ hu
        |       |‐‐ add_mysqldump_2017_11_15_hu.sql.gz
        |       `‐‐ add_mysqldump_2017_11_15_hu.sql.gz.md5
        |‐‐ add_mysqldump_2017_11_16
        |   |‐‐ eu
        |   |   |‐‐ add_mysqldump_2017_11_16_eu.sql.gz
        |   |   `‐‐ add_mysqldump_2017_11_16_eu.sql.gz.md5
        |   `‐‐ hu
        |       |‐‐ add_mysqldump_2017_11_16_hu.sql.gz
        |       `‐‐ add_mysqldump_2017_11_16_hu.sql.gz.md5
        |‐‐ add_mysqldump_2017_11_17
        |   |‐‐ eu
        |   |   |‐‐ add_mysqldump_2017_11_17_eu.sql.gz
        |   |   `‐‐ add_mysqldump_2017_11_17_eu.sql.gz.md5
        |   `‐‐ hu
        |       |‐‐ add_mysqldump_2017_11_17_hu.sql.gz
        |       `‐‐ add_mysqldump_2017_11_17_hu.sql.gz.md5
        `‐‐ add_mysqldump_2017_11_18
            |‐‐ eu
            |   |‐‐ add_mysqldump_2017_11_18_eu.sql.gz
            |   `‐‐ add_mysqldump_2017_11_18_eu.sql.gz.md5
            `‐‐ hu
                |‐‐ add_mysqldump_2017_11_18_hu.sql.gz
                `‐‐ add_mysqldump_2017_11_18_hu.sql.gz.md5
Note that the structure can be understood in detail according to the respective manual, in this case entitled “Daily Domain Name Whois Updates Reference Manual (ccTLDs)”.
The command-line approach.
Again, the same download procedure can be initiated from the command-line:
./download_whois_data.py ‐‐verbose \
‐‐feed cctld_discovered_domain_names_whois \
‐‐startdate 20171112 ‐‐enddate 20171118 \
‐‐dataformat mysqldump,regular_csv \
‐‐tlds hu,eu ‐‐output-dir /scratch/whois_data
Note: we have omitted ‐‐username and ‐‐password: we assume that the wholisxmlapi.ini, file has been set up appropriately, so we don’t need to supply them. If you haven’t done so, please include the ‐‐username and ‐‐password options, too.
What to do if some of the files are not yet prepared when you initiate the download? (The availability times of daily data is a sophisticated issue. It is important to study the description in the manual to understand what is the earliest time when you can download the data.) If you repeat the run of the program with the same parametrization, then you don’t make any harm: it will download the missing or changed files only.
Setting up a Whois database
In this Section we describe some ways of using downloaded bulk Whois data. As we provide MySQL backups directly, first we describe how to load these into your MySQL database. Then we outline further possible database approaches, including noSQL storage methods, such as solr, ElasticSearch, MongoDB, etc. You can load data from the downloaded csv files into these, too.
Create a MySQL database for your data
Having downloaded MySQL backups, the following use cases demonstrate how to bootstrap a database from these. The description of the use cases will also contain considerations of general importance.
USE CASE 3. Create a MySQL database from downloaded quarterly data (ccTLDs “hu” and “eu” from release version 6).
We shall now make us of the data downloaded in use case 1. In particular, the data we need reside in the v6/database_dump/mysqldump/ subdirectory of the directory we choose as the output directory there. There are BASH and Python scripts distributed with the quarterly releases, in our case, for instance, under http://domainwhoisdatabase.com/domain_list_quarterly/v6/docs/mysql_loader_scripts/
First we demonstrate the use of the Python scripts as it has a GUI mode similar to the downloader script and it is portable as well, so you can use it on any operating system. However, for large datasets the Python script is extremely inefficient. Hence, albeit it can be used from command-line, too, we recommend to prefer the BASH loader scripts or consider using binary backups. All these scripts come with detailed documentations (README_Python.txt for the Python script, README.txt for the BASH script), so we do not discuss the details here, rather illustrate the process of loading the data. So let’s get started.
In any case, you will need a MySQL server installed, and an access to an account on it which has the permissions to create databases. We do this with the root account now.
The GUI approach.
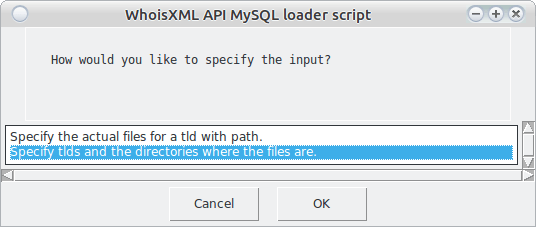
To load the data, you need to start the script load_mysql_data.py. It will first ask for your MySQL credentials:
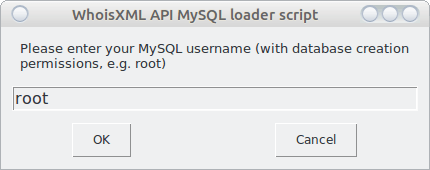
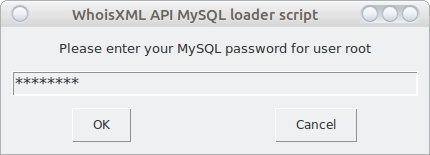
Next it will verify these credentials by logging in and creating, then dropping a temporary database. This will be reported in a dialog window in detail, you can press “OK” there to proceed. The next question you’ll be asked:
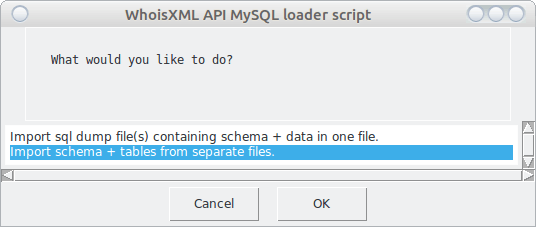
When we choose the first option, the script will use the files in which all data for a tld are saved into the same file. In the case of the second, each table will be loaded from a separate file. (The files for both approaches are downloaded by the downloader script.) Let we choose the second option as it is more efficient also for slightly bigger databases (and really big ones, too, if you use the BASH version of the script).
The next question will be:
Here again we choose the second option. The first one is mainly for those who store the data in a directory structure different from the one in which the data are downloaded. The next window will inform us in some detail what information will provide. We do not reproduce it here, but demonstrate the right choice:
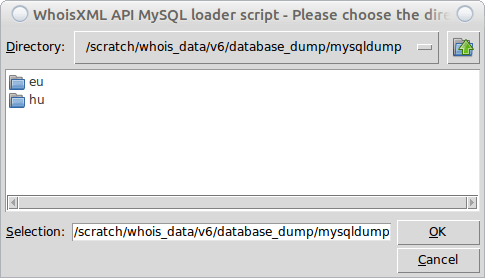
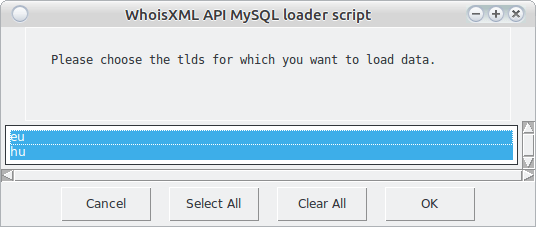
(Note that we are using the data downloaded in use case 1, in the very structure they are stored in by default. If you choose the directory appropriately, you will see TLD-named directories as in the present screenshot.) Finally, we can choose the TLDs to load. We have just two choices but if we had more data in the directory, we could choose a subset. Here we choose all:
Finally, we get a text window showing what will happen next. If we press “OK”, all windows will disappear and we can follow the progress in the terminal or console. This can take time. For large domains such as com, the time maybe even unacceptable. So having understood the concepts with the GUI approach, we may go for the BASH scripts which are more efficient, but less portable, unfortunately.
The command-line approach
The Python loader script can also be operated entirely from command-line, without a GUI, this is documented in its README. For instance, the above described sequence of dialog windows is equivalent to the following command-line (without line breaks):
./load_mysql_data.py ‐‐mysql-user root \
‐‐mysql-password MYSQLROOTPASSWORD \
‐‐table-files-directory /scratch/whois_date/v6/database_dump/mysqldump \
‐‐schema-files-directory /scratch/whois_data/v6/database_dump/mysqldump \
‐‐db-version v6 ‐‐tlds eu,hu ‐‐mode per_table ‐‐verbose
As mentioned, this script is very portable but the price to be paid for this portability is that it is much slower than its BASH counterpart.
So to do the same in BASH we need the script load_mysql_data_per_tables.sh, with the following parameters for the tld “eu”:
./load_mysql_data_per_tables.sh ‐‐mysql-user=root \
‐‐mysql-password=MYSQLROOTPASSWORD \
‐‐mysql-database=domains_whoiscrawler_v6_eu \
‐‐schema-files-dir=/scratch/whois_data/v6/database_dump/mysqldump \
‐‐tld=eu ‐‐db-version=v6 ‐‐verbose ‐‐show-progress
And for the other, smaller domain, we change “eu” to “hu” everywhere. For many domains, this script can be organized into a simple loop (consult the README of the script as an example).
Note that if you prefer loading each tld from a single file, you can use the other script named load_mysql_data_all.sh.
This approach is very suitable for medium-sized domains such as .eu in the example (it takes around an hour to load it, which is acceptable for this amount of data), and even viable for the domain “com”, although it takes a significantly longer time in that case. As an alternative you can use the binary MySQL dumps (percona). For these we also provide sample scripts which can be used for the purpose of loading data. These are to be found in the subdirectory
docs/percona_loader_scripts/
of the quarterly releases.
USE CASE 4: Load the data obtained in use case 2 (daily data) into MySQL
Solution 1: using DB dumps
Taking a look at the database dumps downloaded in use case 2 we will find that for each day and TLD we have a separate file, which will generate a separete table for the given day and TLD. For instance, the file
cctld_discovered_domain_names_whois/add_mysqldump_2017_11_12/hu/add_mysqldump_2017_11_12_hu.sql.gz
will create (or recreate, if they exist) the following tables
- whois_record_hu_add_2017_11_12
- registry_data_hu_add_2017_11_12
- contact_hu_add_2017_11_12
- domain_names_hu_add_2017_11_12
and fill them up with their contents. You can load these to MySQL simply by executing the whole script. In our example we shall create a new database for these data as MySQL root:
mysql> CREATE DATABASE daily_domain_data
and then load the data with the following command-line in the directory where the dump file resides:
zcat add_mysqldump_2017_11_12_hu.sql.gz |\
mysql ‐‐user=root ‐‐password=MYSQLROOTPASSWORD daily_domain_data
A similar procedure can be followed for other daily downloads, too. It is likely, however, that the structure of the database created in this way is not quite what you need, e.g. you may want to extend a quarterly database with new data or accumulate data from a daily feed into a single table. In order to do so, first you need to study the manuals to figure out which are the data you need: daily feeds serve data from various sources, formats, and structure, so you will certainly find which of these fits your task the most. Having downloaded the data from the feed, the task of merging multiple days or TLDS into a single file can be realized by custom MySQL scripts or stored procedures. The benefit of using MySQL dumps is, however, that you obtain a normalized dataset this way.
Alternatively, you may prefer downloading CSV data and prefilter them before loading. We go into some details of this in the next paragraph.
Solution 2: using CSV files
We have downloaded csv files in use case 2, too. It is possible to load them into a MySQL database, too. (They are useful for many other purposes; these we shall outline in Section 2.2.)
We provide sample script for this purpose, e.g. under http://bestwhois.org/domain_name_data/docs/loader_scripts/csv/schema/
The scripts are written in BASH and they are suitable for loading quarterly data, too.
Our data can be loaded e.g. like this:
./load_csv_file_into_db.sh ‐‐mysql-user=root \
‐‐mysql-password=MYSQLROOTPASSWORD \‐‐mysql-database=daily_domain_data
‐‐schema-file=loader_schema_full.sql \
‐‐csv-file=/scratch/whois_data/cctld_discovered_domain_names_whois/2017_11_12_hu.csv \
‐‐csv-format full
(note that we have uncompressed the file 2017_11_12_hu.csv before loading it, we have run the script from its working directory and have supplied the full path of the file). The script does simply create a table named “whois_record_flat” if it does not exist yet and it loads the data into it as they are. If the table already exists, we may load additional files into it by invoking the script again. In this way we can merge the data for multiple days. However, in contrast to the case of using MySQL dumps, our data are not normalized now: we have a single table (hence the word “flat” in its name).
If you plan a more elaborate preprocessing with your own script, you can take look into the script itself: it is just a sample script, the main job is done in its last few lines. You can use this as a sample to develop your own script.
Alternative database solutions
In this Section we quickly demonstrate how you can set up various types of Whois databases for yourself based on WhoisXML API csv data. Certainly this is viable for all popular relational database management systems including Oracle, MS SQL, PostgreSQL, firebird, etc. However, we do not go into their details here, we focus on non-relational approaches instead. The analysis of Whois databases can be very efficiently performed with search engines like Solr or elasticsearch, as it is done by some of our clients (see https://github.com/MITRECND/WhoDat as an example.)
Here, for simplicity, we describe here how to load csv into MongoDB which is very simple, even if you have not yet encountered this kind of database system.
MongoDB
MongoDB is a document-based database management system gaining an increasing business share. It can be advantageous in some applications.
You can easily create your Whois database in MongoDB, as it will be illustrated below.
(If you are using MongoDB the first time, all you need to do as a prerequisite is to install MongoDB to your computer, it is available for free from their web page: http://www.mongodb.com. Then you can immediately try the examples below.)
The csv files downloaded from WhoisXML API can be readily loaded into a Mongo Database, as they are very standard ones and they include a header line from which the import utility determines the structure of data.
Let us now load the quarterly v6 data for the .hu domain we downloaded in usecase 2. We just go to the subdirectory v6/csv/tlds/simple of our download directory. There we find a gzipped tar archive named csvs.hu.simple.tar.gz. Uncompressing it by
tar zxvf csvs.hu.simple.tar.gz
(or by your favorite uncompression utility) it appears to contain the subdirectory simple/hu, in which there are five csv files, from 1.csv to 5.csv. To import them, all you need to do is
mongoimport -d my_whois_database -c first_whois_collection \
‐‐type csv ‐‐file 1.csv ‐‐headerline
Which produces an output like:
connected to: 127.0.0.1

2017-11-27T19:30:33.011+0100 		Progress: 3742916/21150375	17%

2017-11-27T19:30:33.011+0100 			17700	5900/second

2017-11-27T19:30:36.003+0100 		Progress: 13376309/21150375	63%

2017-11-27T19:30:36.003+0100 			63200	10533/second

2017-11-27T19:30:38.767+0100 check 9 100001

2017-11-27T19:30:38.975+0100 imported 100000 objects
Next we do the same for all the other csv-s (to 5.csv in our case, maybe organized into a loop).
Data are imported now. We may play around with them by starting a mongo shell:
mongo ‐‐shell
Here we have to select the database we have created:
>use my_whois_database
Let’s count first how many records we have loaded:
> db.getCollection("first_whois_collection").count()
The result is 445155, just the same as the number of data lines in the input csv files if you count.
To take a look at the data in our collection (would be “table” in the sql terminology):
>db.getCollection("first_whois_collection").find()
will display all the records. Taking a look at them it is apparent that they are easily accessible in JSON or XML upon a query. Hence, as compared to relational databases such as MySQL, in MongoDB we can import data of different structure into the same collection. (The “records” are “documents” here, they are stored along with their structure.) For instance, if we uncompress (e.g. with gunzip) some daily data in the cctld_discovered_domain_names_whois subdirectory of our download directory, e.g. this one: 2017_11_12_hu.csv.gz. Now if we do
mongoimport -d my_whois_database -c first_whois_collection \
‐‐type csv ‐‐file 2017_11_12_hu.csv ‐‐headerline
we can observe that our collection will hold the additional daily data, too, even though the set of fields of the csv file is different.
If you are new to MongoDB we recommend at this point to explore its capabilities by taking a look at https://docs.mongodb.com/manual.